
Photo by Venti Views on Unsplash
Deploying a Phoenix Web App to AWS App Runner: A Step-by-Step Guide
Table of contents
Nowadays, deploying web applications with containers is the norm, but who wants to go down the rabbit hole managing containers when you can instead use that time to work on your product?
In this post, we will create and deploy a Phoenix web application in AWS App Runner. App Runner simplifies the deployment and management of your dockerized application, providing some extra features out of the box like:
Automated Deployments
Load Balancing
Auto Scaling
Logs and Metrics
SSL/TLS Certificate Management
App Runner takes care of starting, running, scaling, and load balancing your service. It works with two types of repository sources, source code –directly from GitHub– or docker images –from Amazon Elastic Container Registry (ECR)–. When using a code-based source like GitHub, then App Runner supports several runtimes such as Go, Java, .NET, Node.js, PHP, Python, and Ruby. I found the Docker image-based flavor handy when your programming platform is not supported directly by App Runner or you need full control of the environment that will be running your application.
Because Elixir is not supported by App Runner, we will be deploying our application through the Docker image option.
During this step-by-step we are going to going to focus on three different areas:
Creating the App: We need a dockerized web application to deploy in App Runner, and that is what we are going to build in this section. If you already have a web application or API running in docker, feel free to jump to the next section.
Automating the Docker image build: Our next step will be to automate the build of the Docker image, from GitHub to Amazon ECR.
Hosting the app in App Runner: Lastly, we will configure App Runner to host our web application.
Let's start!
1. Creating the App
Installing dependencies
There are two dependencies that we need to install to create a Phoenix app, the programing language, Elixir and the Phoenix Framework.
Installing Elixir
On macOS, it can be easily installed through homebrew; for other options, check Elixir's installation guideline: elixir-lang.org/install.html.
brew install elixir
The command above will install Elixir and Erlang and all the required dependencies on macOS.
Installing the Phoenix Framework
Let's use Mix, Elixir's built-in tool to manage dependencies and other tasks to install the Phoenix Framework.
mix archive.install hex phx_new
Once Phoenix is installed, the phx.new generator will be available to create our first application. Full instructions to install Phoenix here: hexdocs.pm/phoenix/installation.html.
Creating a new Phoenix app
To keep things simple as possible we are creating a web app without a database. Ecto is the go-to database toolkit for Elixir apps and it is configured by default for new Phoenix apps. So, we need to tell phoenix to create an app omitting the database layer. We will use the --no-ecto flag to achieve that.
Our app is called demo and we are telling Phoenix to create it without support for databases:
mix phx.new demo --no-ecto
hexdocs.pm/phoenix/up_and_running.html
Locally testing our app
Once the application has been created, browse in your terminal to the application directory and launch a local phoenix server:
cd demo
mix phx.server
Yes, that is all you need to run a local Phoenix server. The output will be similar to this:
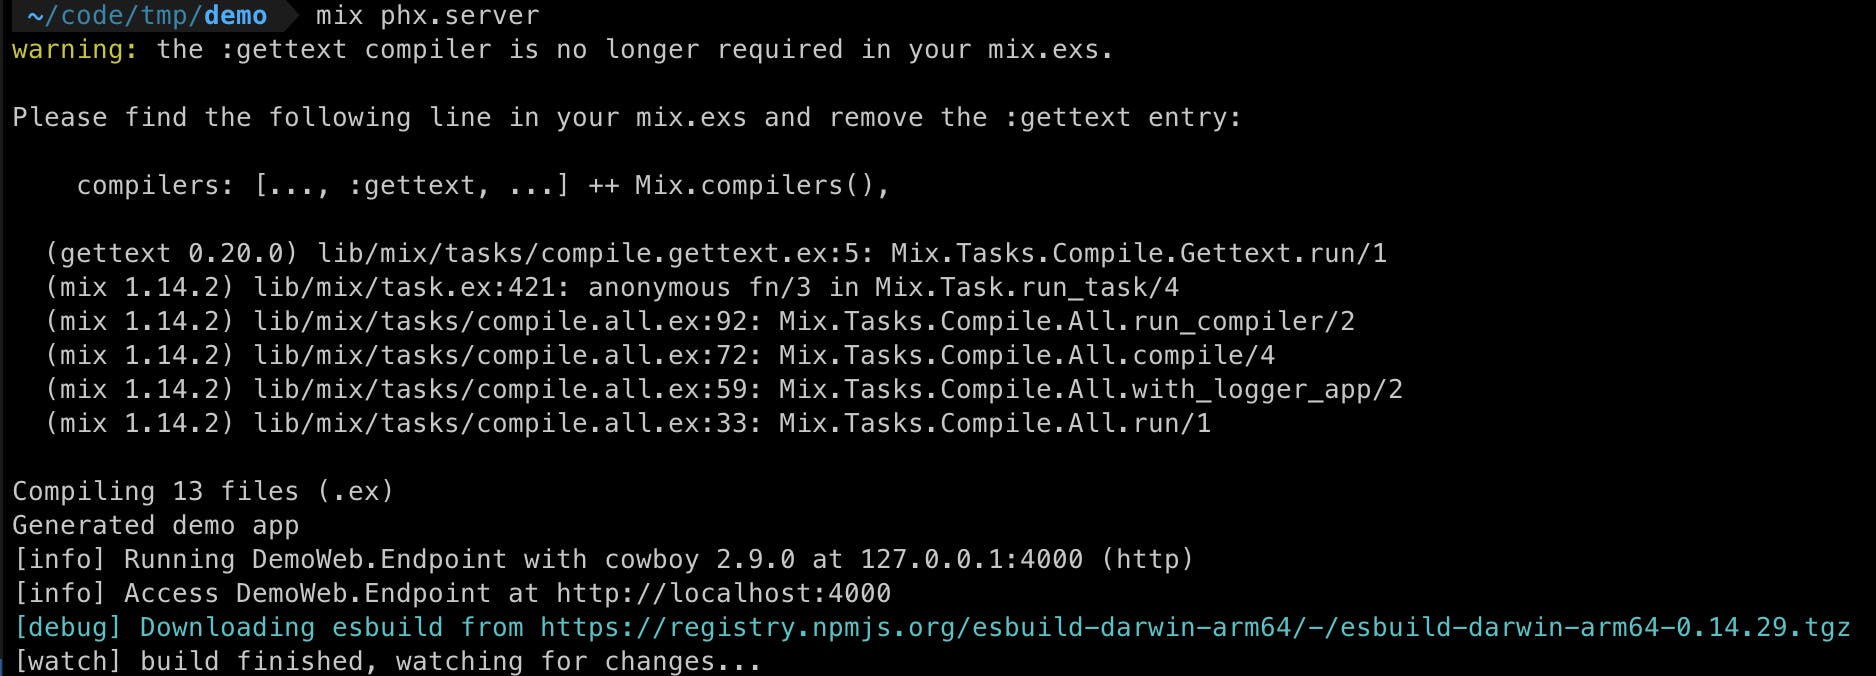
Point your web browser to http://localhost:4000 and our Phoenix demo application will be there:
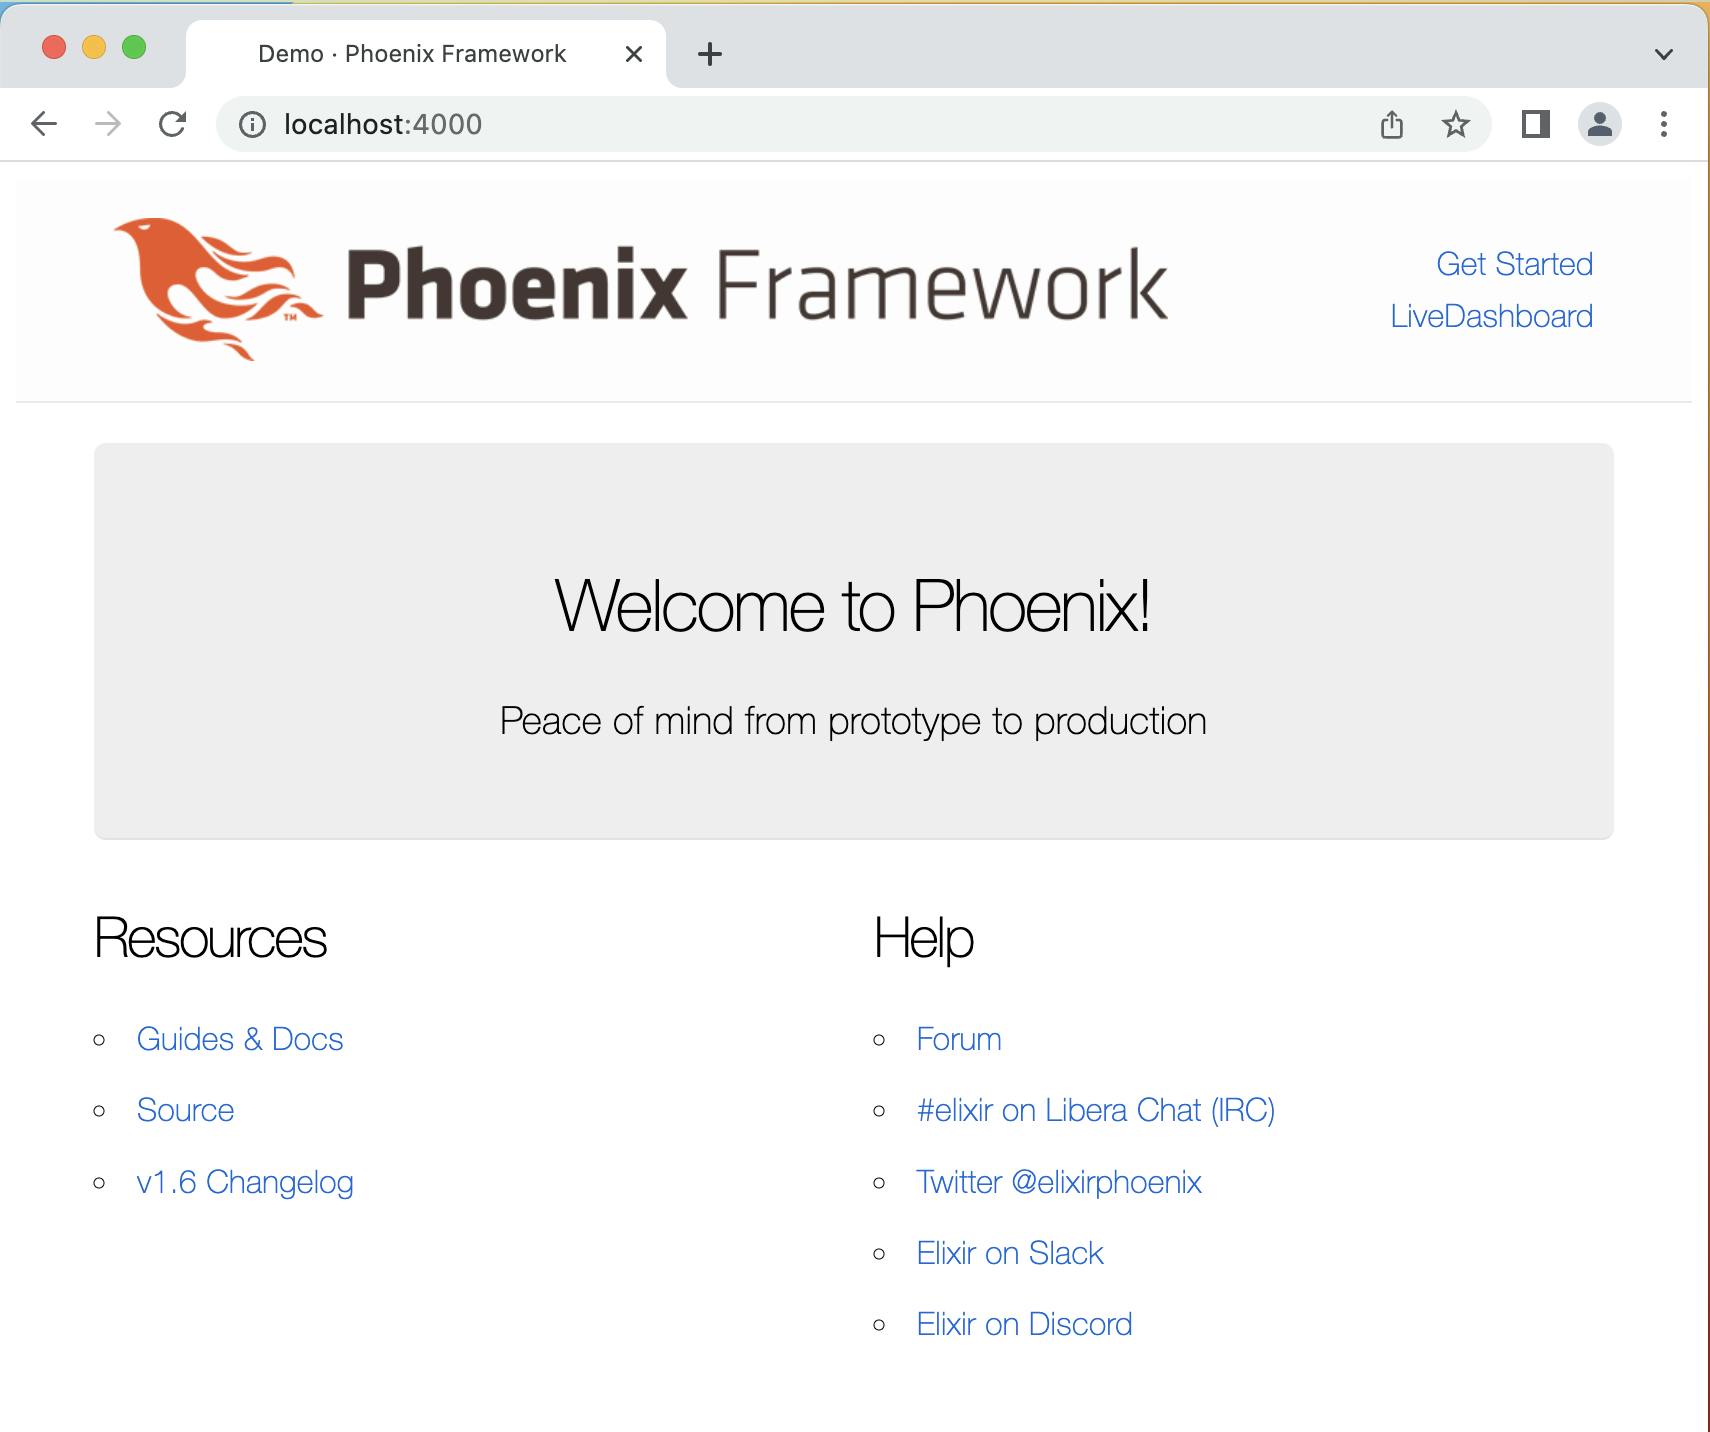
Creating a Docker image
To create our docker image we need a Dockerfile, this file specifies the steps to create the docker image, like a cooking recipe. Again, Phoenix can give you a working dockerfile for your project, just ask for it with the phx.gen.release generator, then create the docker image. Run the following commands on the main folder of your application:
mix phx.gen.release --docker
docker image build -t demo .
Generating a secret key
The secret key base is used to sign/encrypt cookies and other secrets. A default value is used in config/dev.exs and config/test.exs but you want to use a different value for production and you most likely don't want to check this value into version control, so we use an environment variable instead:
# generate a new secret key
mix phx.gen.secret
XevO6j...JZHk/JQ...jY2rb/4K...pCk/O83...UY+i

# set the secret key as an environment variable
export SECRET_KEY_BASE=XevO6j...JZHk/JQ...jY2rb/4K...pCk/O83...UY+i
Locally testing our docker image
Before moving forward to the next step, make sure that your web application can run inside a Docker container with no issues. The command below will run a Docker container, exposing port 400 to the localhost. The -e flag tells docker to read the environment variable SECRET_KEY_BASE and pass it inside the container:
docker run -dp 4000:4000 -e SECRET_KEY_BASE demo
2. Automating the Docker image build
Our next step is to automate the build process of our Docker image.
The image-based flavor version of App Runner that we are going to use can automatically deploy our application every time we push a new image to Amazon ECR. The process looks like this:
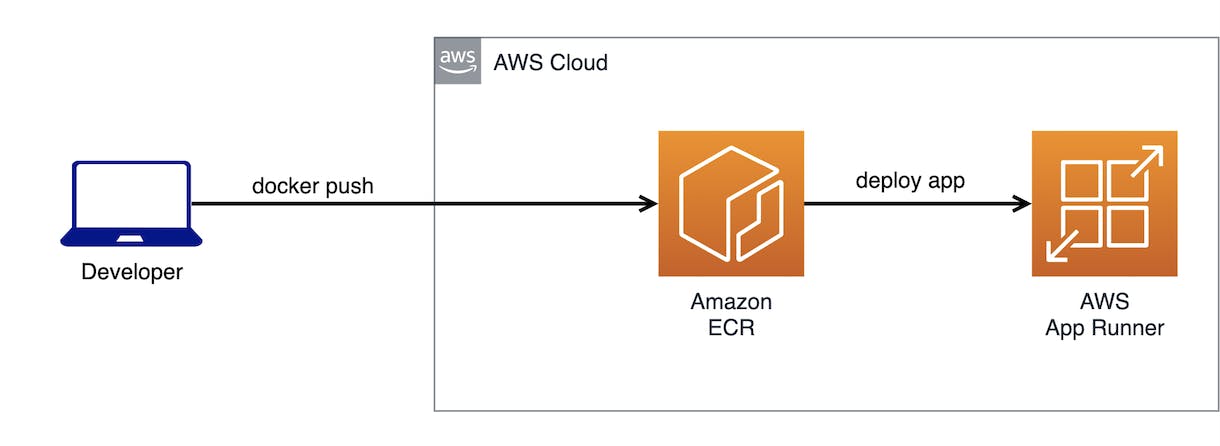
App Runner gets notified when a new image is available in ECR and deploys a new version of our containers. But, how can we automate the deployment workflow to detect when a new commit has been pushed to our git repository? To solve this part of the deployment workflow we are going to introduce AWS CodePipeline and AWS CodeBuild:

CodePipeline can detect changes in our GitHub repository and invoke CodeBuild with the latest version of our code in the main branch. Then CodeBuild is going to generate a docker image with the latest version of our code and push it into our private ECR repository. Then we already know the rest of the story, App Runner will get notified about the new image in ECR and deploy one or more containers based on our App Runner Deployment Configuration.
So, let's start by creating our Amazon ECR repository. Then we will move forward with setting up CodePipeline and CodeBuild to complete our CI/CD pipeline.
Creating a Git repository
I'm using GitHub, but CodePipeline also supports AWS CodeCommit and Atlassian Bitbucket.
I'm not covering the details of this step but here you have the GitHub documentation to create a repository and upload your existing local code. I'm sure that you are already familiar with this: https://docs.github.com/en/get-started/importing-your-projects-to-github/importing-source-code-to-github/adding-locally-hosted-code-to-github.
Creating the Amazon ECR repository
In your web browser, access the Amazon ECR console us-east-1.console.aws.amazon.com/ecr/reposi.. to create a new ECR repository. This is your docker registry repository, where your docker images will be stored.
I'll go with all the defaults in my case for a private repository:
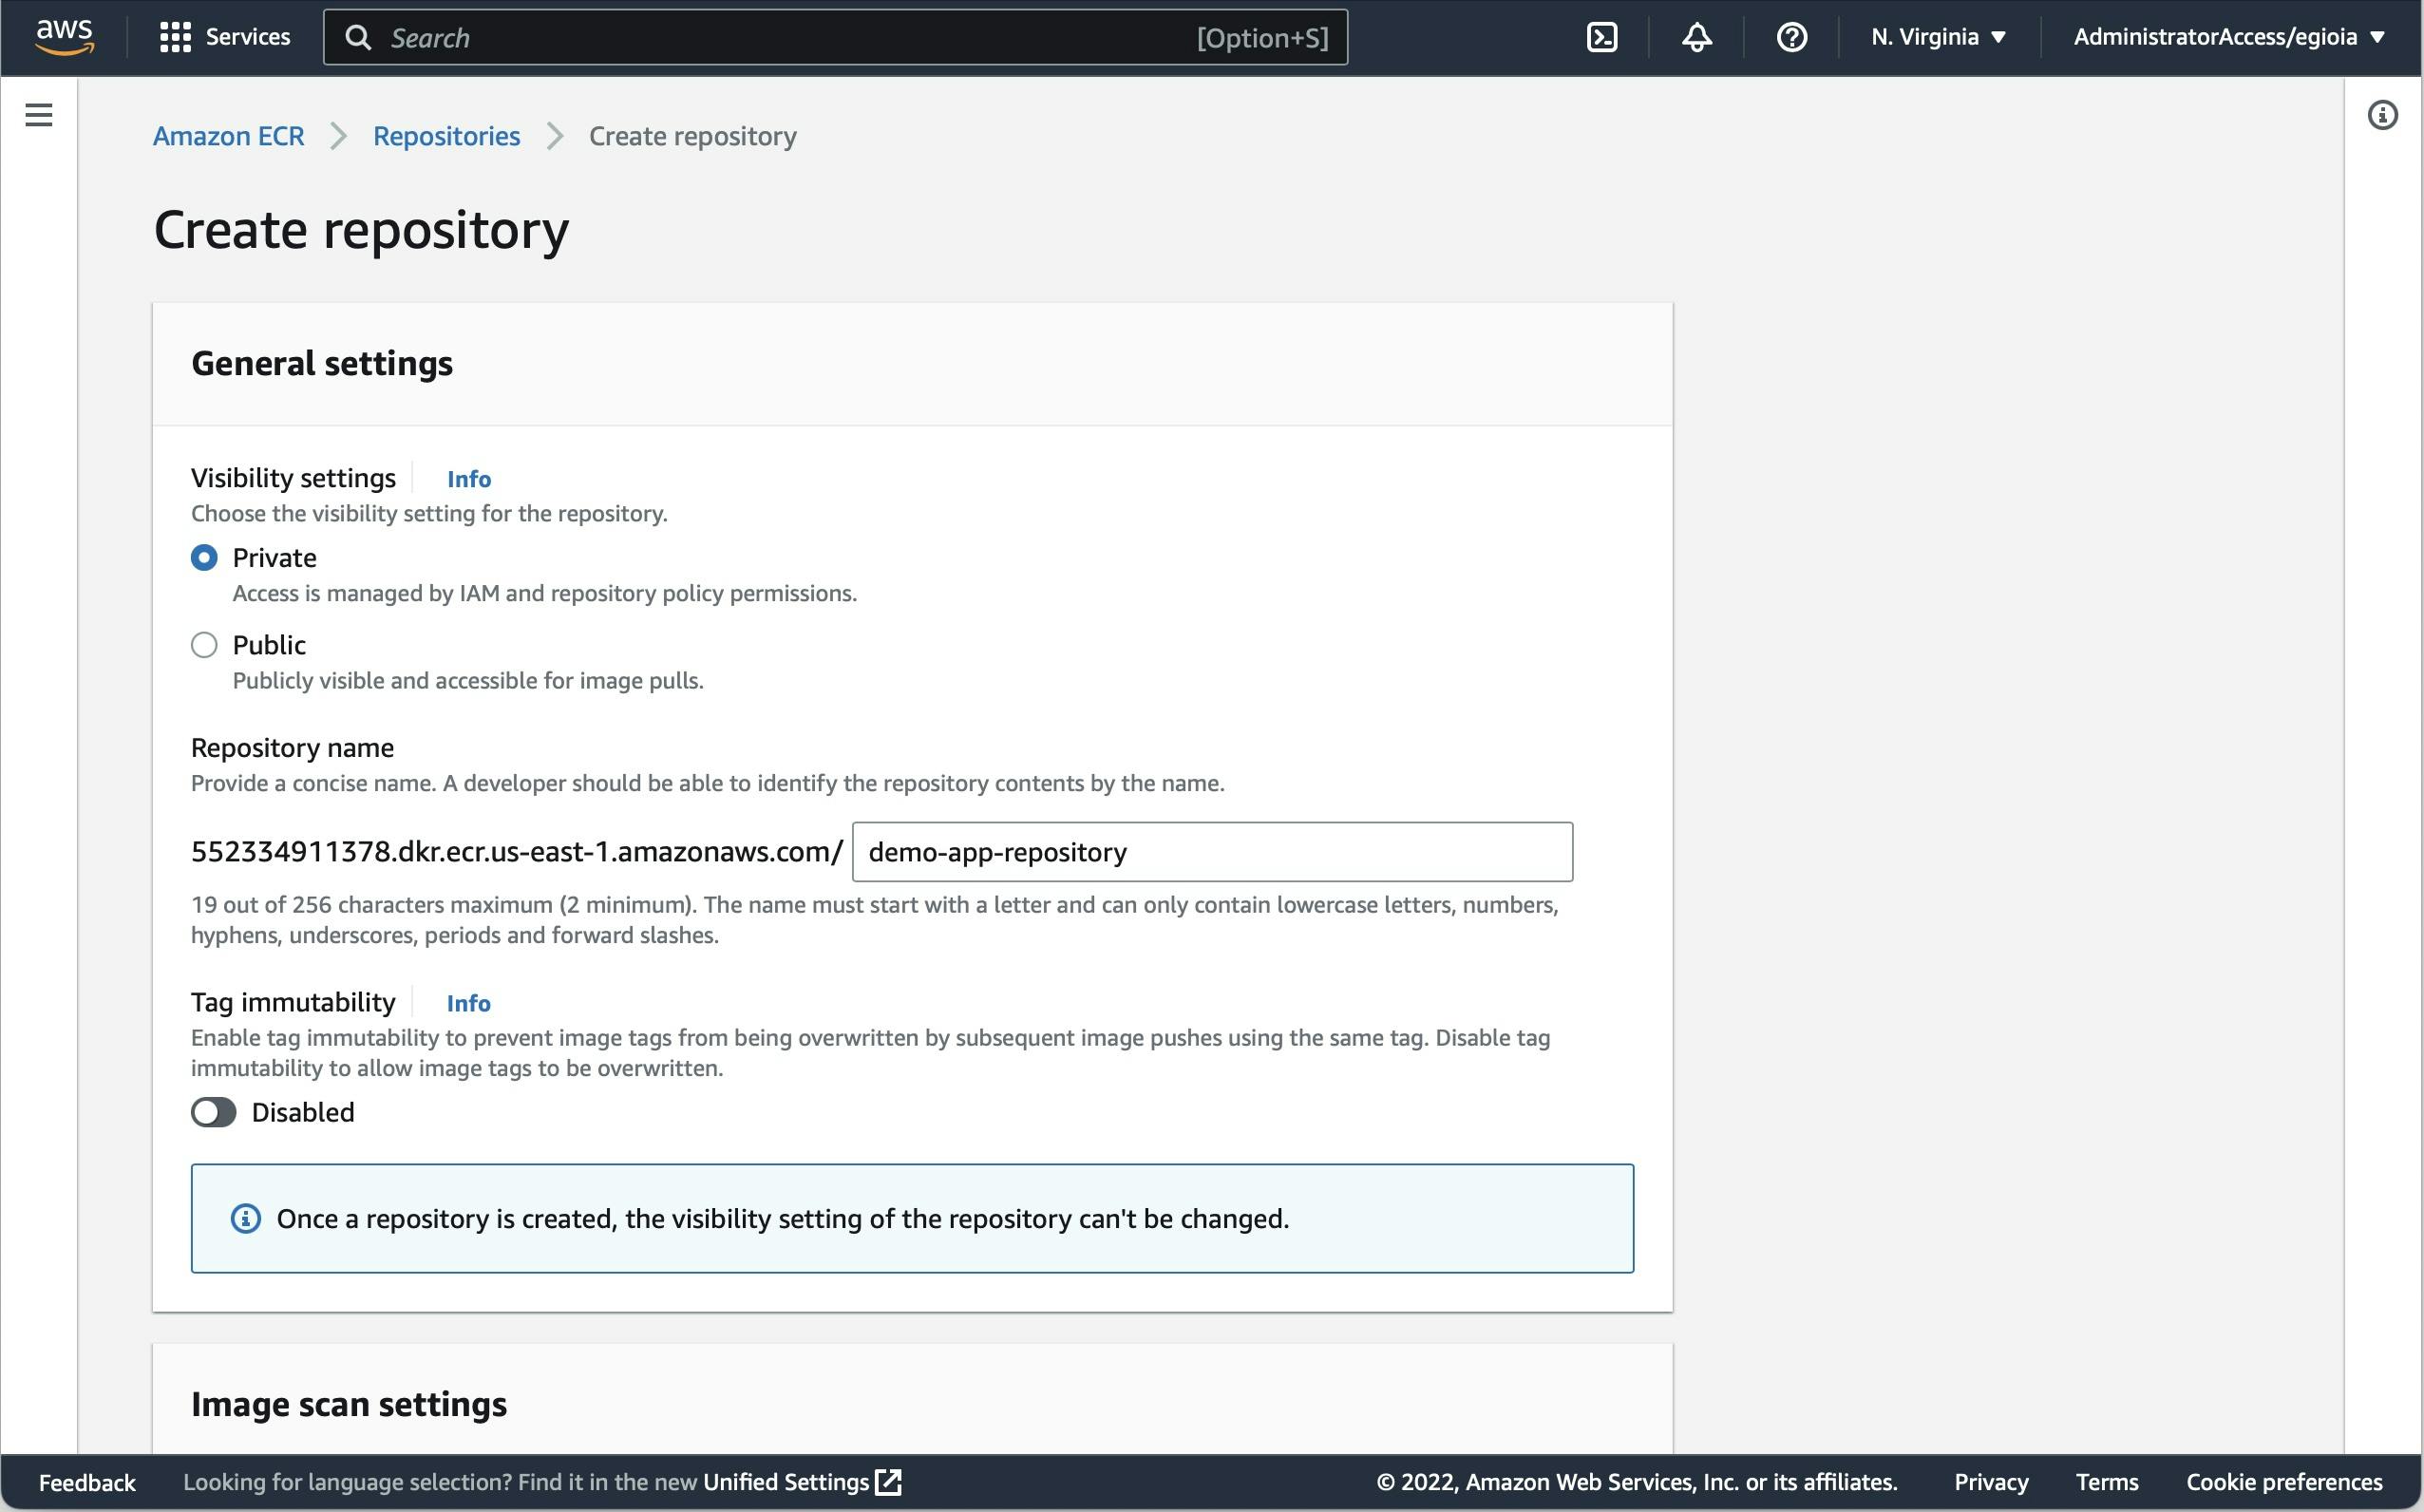
Note: at the time of writing, ECR is the only Docker repository supported by App [Runner. Other repositories like Docker Hub will not work.
Verify if ECR is working:
Once the ECR repository is created, access it in the ECR web console and click on View push command button located at the top bar.

Follow the instructions provided based on your operative system, macOS/Linux or Window:
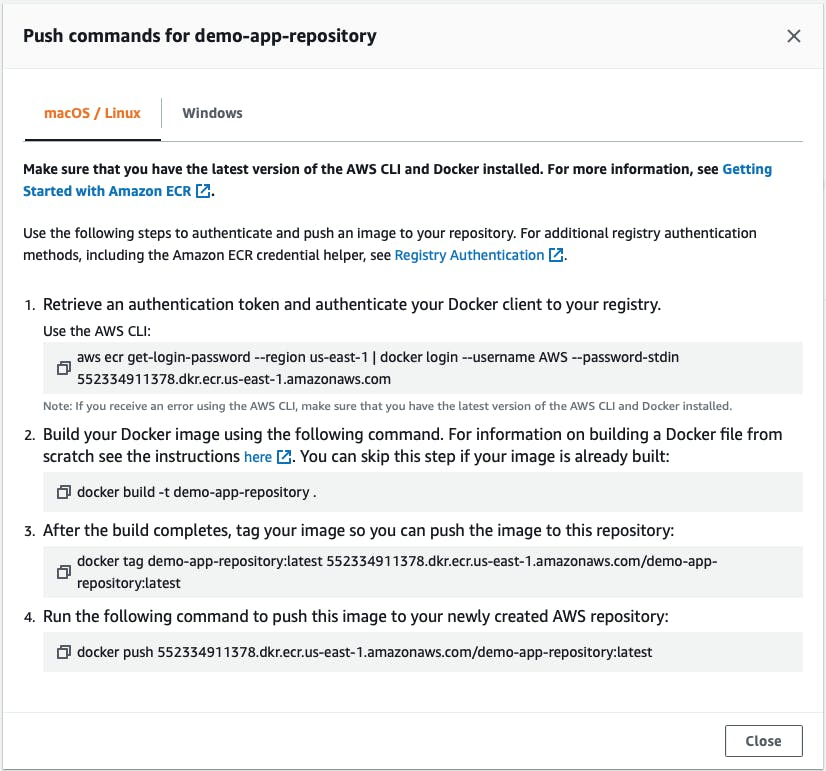
After running your docker push, you should see your docker image listed in the ECR repository web console.
CodeBuild and CodePipeline
With the git repository and the ECR registry created, it is time to configure our CI/CD pipeline with CodePipeline and CodeBuild AWS services.
Let's start by creating the pipeline. This is a five-step wizard that walks us through all the settings.
Define a new CodePipeline and CodeBuild step
Access the CodePipeline web console and click on "Create pipeline" button.
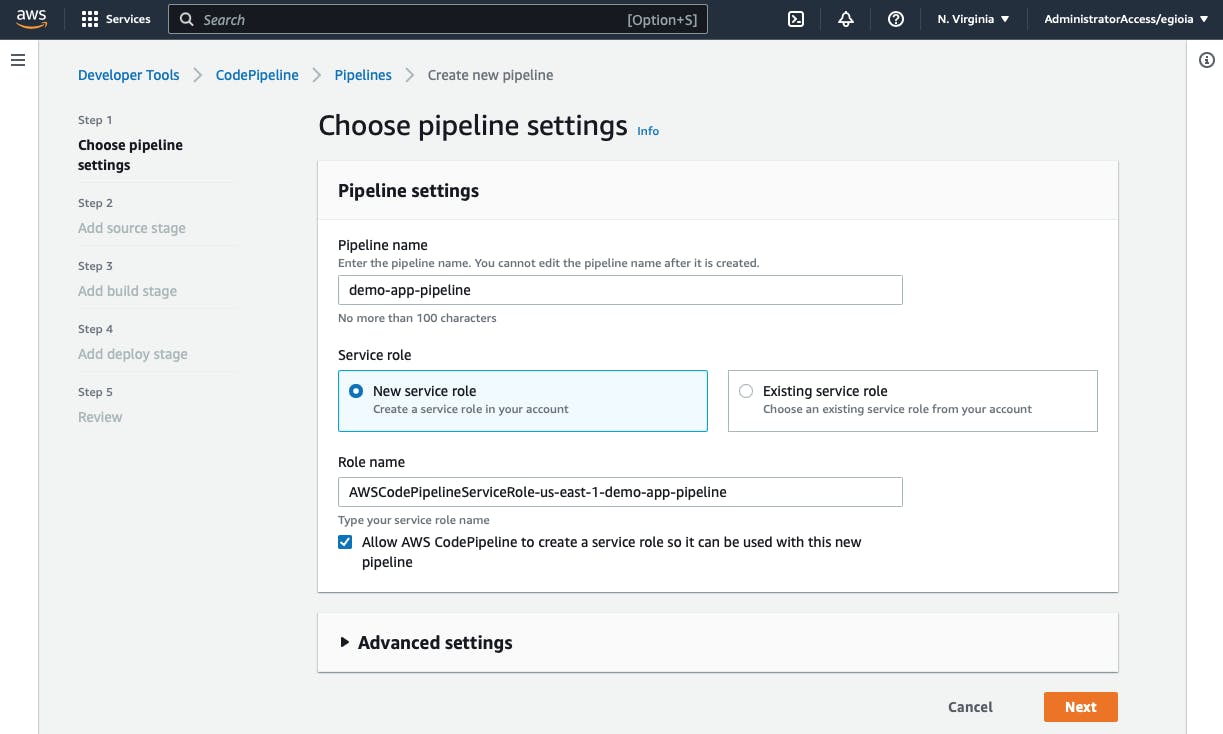
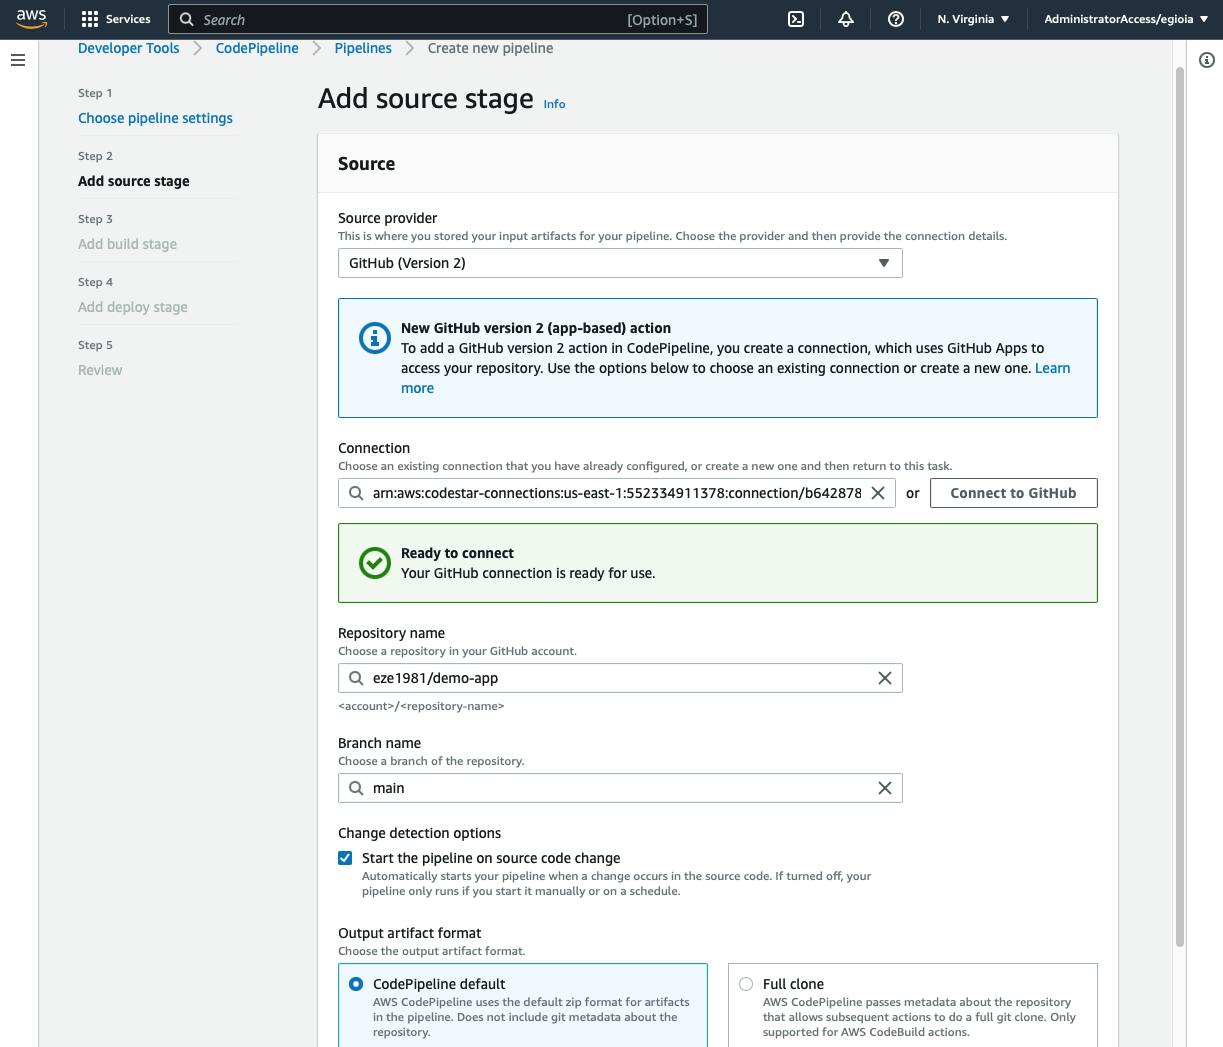
Add source stage: this is where we are going to connect our GitHub repository. Select GitHub (Version 2) as the source provider, then click on Connect to GitHub. This will open a dialog to grant the AWS Connector for GitHub access to your GitHub repository. As a best practice, I like to give access to the repository involved instead of all the repositories in my GitHub account. Once the AWS Connector is configured, the pipeline screen should look similar to this:
Add build stage: this is where CoudeBuild will create a new docker image and push it to ECR every time a code change in the main branch is detected.
Choose CodeBuid as the build provider and click on "Create project" button.
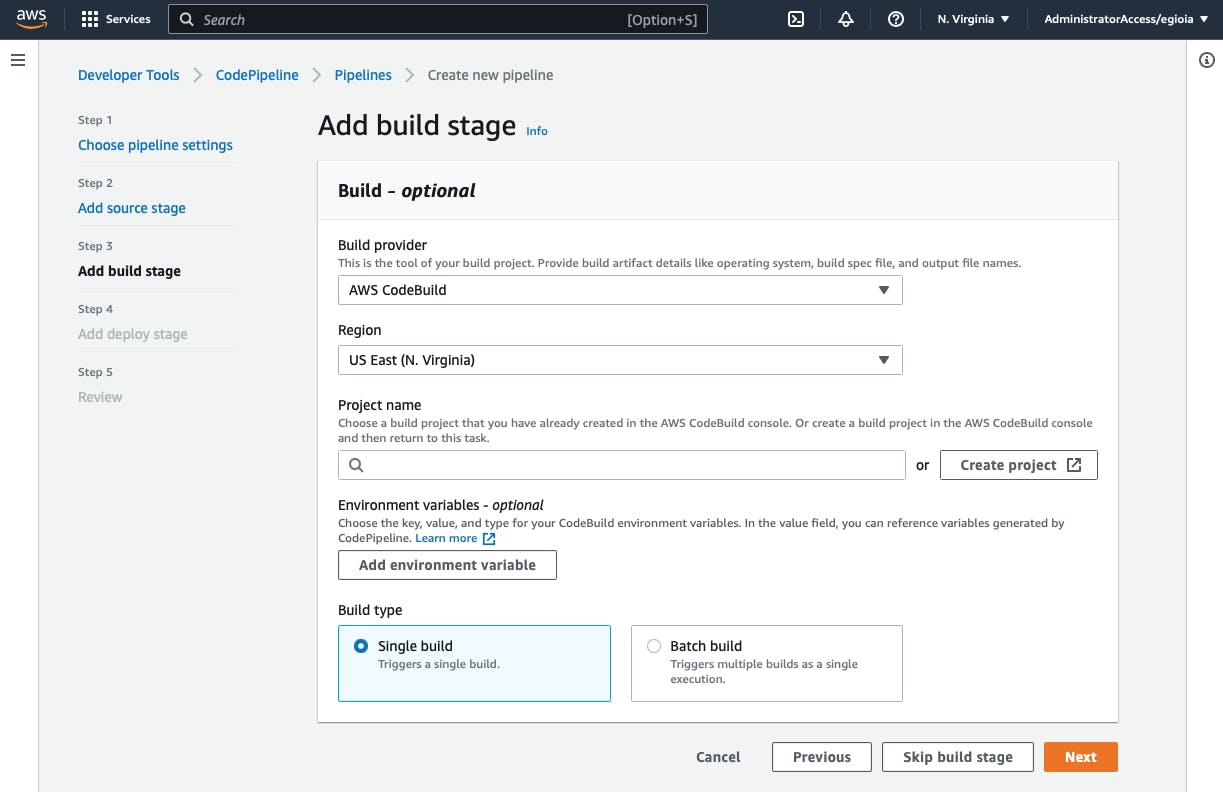
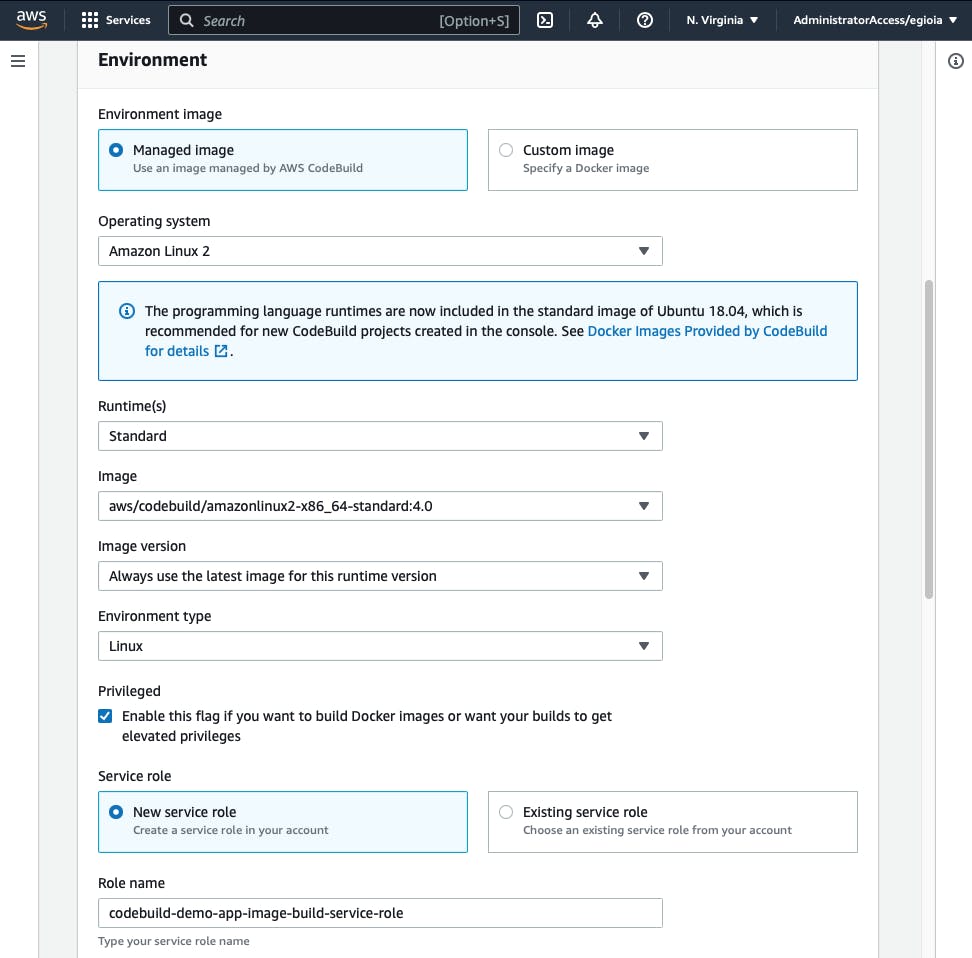
We need to define a CodeBuild project. This is where we can set up all the configurations related to the build process, like the operative system used for the build machine, pre-installed runtimes, support for GPU during the build process, etc.
In my case, I choose:
Operative system: Amazon Linux 2
Runtime(s): standard
Image: latest image available
Image version: "Always use the latest image for this runtime version"
Environment type: Linux
Privileged: check this box. The build instance needs privileged access to build Docker images.
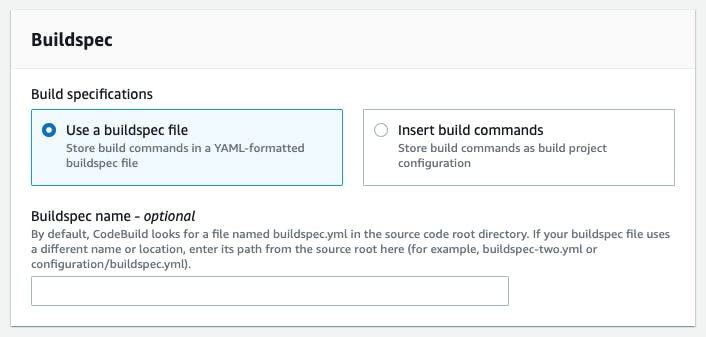
Buildspec: make sure to keep the default values for the Buildspec section. The expectation is that CodeBuild will look for a file named buildspec.yml at the root level of our git repository. That is the file where we can define the commands for the build process. We are going to configure this in a few minutes.
Click on "Continue to CodePipeline". This will create the CodeBuild and bring us back to the pipeline wizard:

Click on "Next" and then "Skip deploy stage". The deployment component of our pipeline will be provided by App Runner itself, which is why we are skipping this stage. Review the settings and click on "Create pipeline".
The CI/CD pipeline is almost ready. We need to adjust some permissions and add our buildspec.yml file to the repository.
Setting up the IAM permissions:
CodeBuild needs permission to push the new docker images in Amazon ECR. Access the IAM console, search for the role created by CodeBuild and attach a new IAM policy to the role with the following permissions adjusting the arn ECR repository path:
{
    "Version": "2012-10-17",
    "Statement": [
        {
            "Sid": "ReadAndWriteAccessToDemoAppRepository",
            "Effect": "Allow",
            "Action": [
                "ecr:GetDownloadUrlForLayer",
                "ecr:BatchGetImage",
                "ecr:CompleteLayerUpload",
                "ecr:UploadLayerPart",
                "ecr:InitiateLayerUpload",
                "ecr:PutImage",
                "ecr:BatchCheckLayerAvailability"
            ],
            "Resource": "arn:aws:ecr:us-east-1:552334911378:repository/demo-app-repository"
        },
        {
            "Sid": "ListECRImages",
            "Effect": "Allow",
            "Action": [
                "ecr:DescribeImages",
                "ecr:GetAuthorizationToken"
            ],
            "Resource": "*"
        }
    ]
}
Buildspec.yml: create a new file at the root level of your git repository named buildspec.yml and paste the code below renaming the ECR repository URI. The buildspec file has two phases defined, a pre_build phase to get the ECR credentials and pull the latest existing image from ECR and the build phase, which has the commands to build a new Docker image and push it into the ECR repository. Replace the ECR URI with your own:
version: 0.2

env:
  variables:
    CONTAINER_REPOSITORY_URL: 552334911378.dkr.ecr.us-east-1.amazonaws.com/demo-app-repository
    TAG_NAME: latest

phases:
  pre_build:
    commands:
      - aws ecr get-login-password --region us-east-1 | docker login --username AWS --password-stdin 552334911378.dkr.ecr.us-east-1.amazonaws.com
      - docker pull $CONTAINER_REPOSITORY_URL:$TAG_NAME || true

  build:
    commands:
      - docker build --tag demo-app-repository .
      - docker tag demo-app-repository:latest 552334911378.dkr.ecr.us-east-1.amazonaws.com/demo-app-repository:latest
      - docker push 552334911378.dkr.ecr.us-east-1.amazonaws.com/demo-app-repository:latest
Now it is time to commit and push the buildspec.yml file, this time it should trigger the CI/CD. pipeline and after a couple of minutes we should see a new Docker image in our ECR repository.
3. Hosting the app in App Runner
Configure App Runner
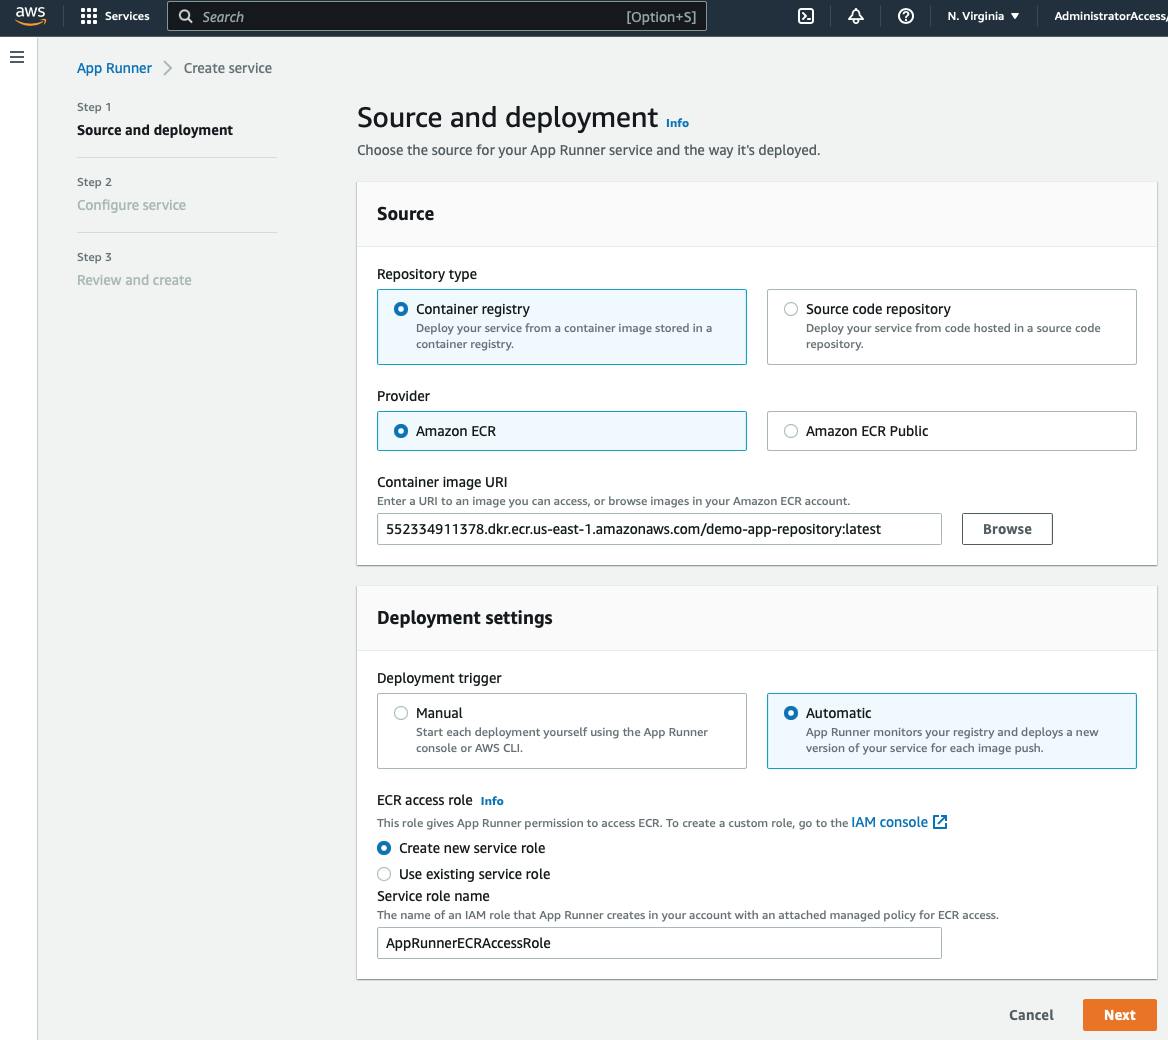
Open the AWS App Runner console and click on "Create service". Once in the App Runner wizard, select the Container registry and Amazon ECR as the source type. Then click on Browse and select the latest Docker image.
Select the deployment settings that you prefer and click on Next. I choose Automatic deployments:
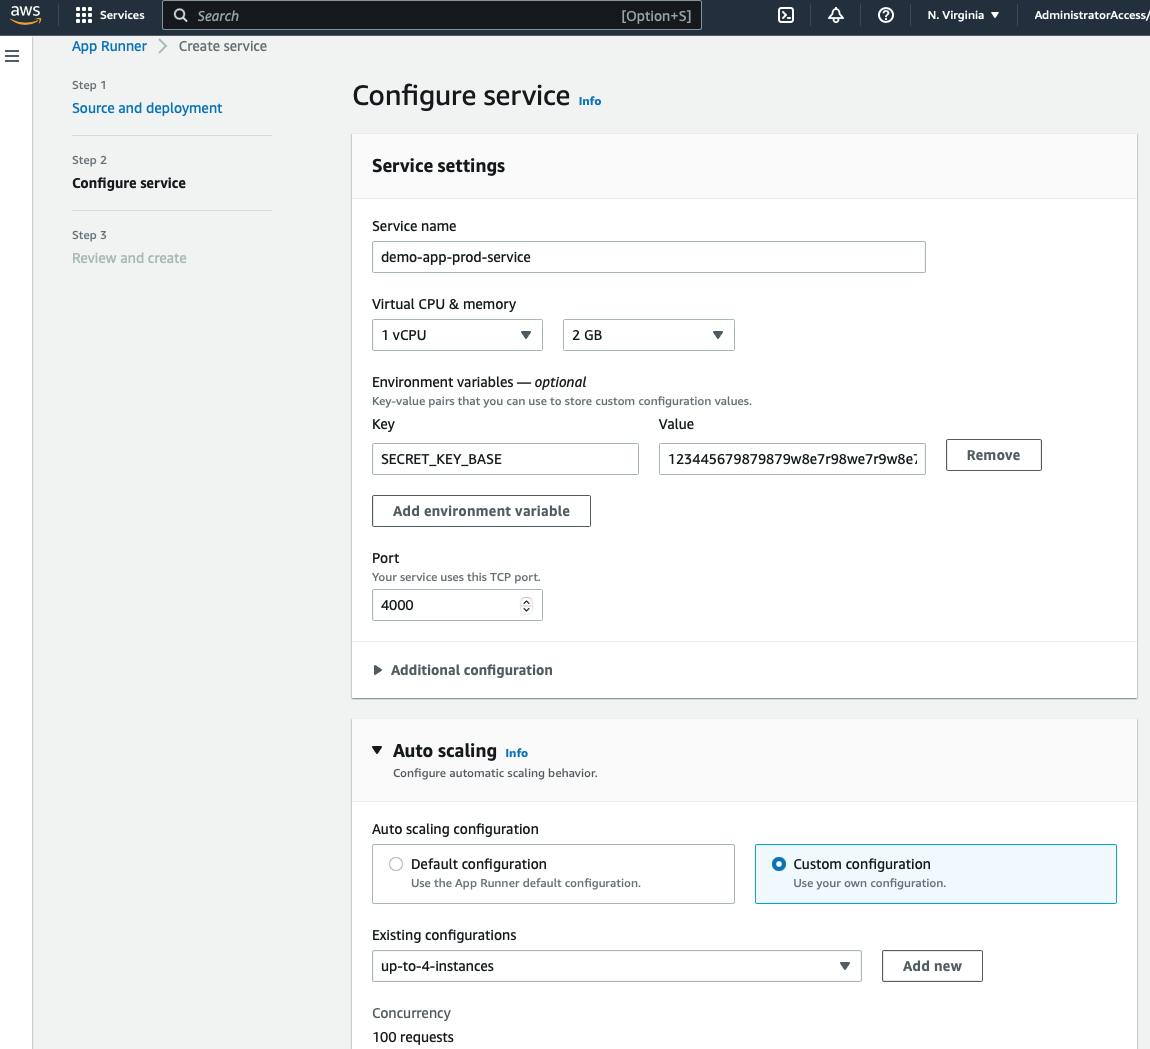
The next and last step is to configure the details for the App Runner service, here is where we have some control over the environment that will be running our app like the number of CPUs, memory per container, and when App Runner needs to automatically scale the number of containers.
For this application I'll go with the minimum environment possible, 1 vCPU, 2 GB of memory, and a custom auto-scaling configuration that will create up to 4 instances. By default App Runner will scale up to 25 instances, and it will deploy a new instance when the number of simultaneous requests per instance exceeds 100.
Another import setting that makes on this page is the port number. Our Phoenix app is running on the default port, 4000. Also, we need to specify the SECRET_KEY_BASE environment variable:
Click on "Create and deploy", and after a couple of minutes –it took around 4 minutes in my case– you will see your app running. App Runner will create a domain name for us that will look similar to this:
https://SOME-RANDOM-NAME.REGION.awsapprunner.com
And that is the end of this guide. I hope it helped you with your project!
Conclusion
We learned how to create an Elixir Phoenix web application, store the code in GitHub, containerize our application, create a CI/CD pipeline and host a web application in AWS without having to worry about any piece of infrastructure. We are not managing virtual machines, container infrastructure, or tools, everything is managed by AWS.
We also got some interesting features out of the box like:
SSL/TLS certificate
Auto-scaling and load-balancing capability based on the number of requests
Easy access to the application logs
Important metrics like:
Number of successful requests (2XX)
Number of failed requests (5XX)
Number of active instances
Request latency
Some of the limitations that I have faced so far:
Access to databases in a VPC requires more advanced network configuration since App Runner lives in a VPC managed by AWS
The observability feature can be configured only during the App Runner Service definition. Once you create the service, this cannot be changed.
When using the App Runner source code repository option instead of ECR, then only GitHub is supported.
When using the Container registry option, then only Amazon ECR is supported. No chance to host your docker image in Docker Hub and connect it with App Runner.
App Runner is a great service, especially for those developing minimum viable products. It allows you to focus on your project, providing in minutes an initial setup that can serve for many years and customers to come.
Resources
Official AWS App Runner Workshop:
- Getting started with AWS App Runner :: AWS App Runner Workshop: https://www.apprunnerworkshop.com/getting-started/
For those who want to run the extra mile, here you have great information to optimize the docker build process and general best practices for your docker files:
Speed up your Docker builds with –cache-from:https://lipanski.com/posts/speed-up-your-docker-builds-with-cache-from
Best practices when writing a Dockerfile for a Ruby application:
Reducing Docker image build time on AWS CodeBuild using an external cache:https://aws.amazon.com/blogs/devops/reducing-docker-image-build-time-on-aws-codebuild-using-an-external-cache/
Enjoy!

